Pages

Monday, May 25, 2015

DIY Backyard Raised Garden Beds for Beginners

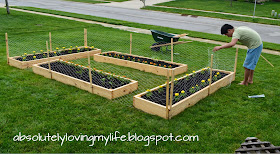
We decided to start a garden this year!  I have no idea if we will have a successful garden this year or not, as this is a first time experience for us.  We may still need to learn a few things about growing plants, but at least our backyard garden isn't hideous to look at! I think it looks pretty good!

I credit my beautiful garden to my handy husband! He pretty much did this project by himself, with me communicating what I wanted through an upstairs window, as I was busy inside of the house with the twins.

For a first year garden, there is a bit of investment with supplies.  We spent close to a couple hundred bucks when it was all said and done!  That sounds a bit high, but most of that was on supplies that we won't have to to buy again next year.  I wanted my backyard garden to not only produce a small amount of produce that we could consume and maintain as a family, but I also wanted my garden to look attractive!  For me, it is an investment well-spent!


Step One: Buy Supplies

We put our garden together in four Saturday afternoons.  Everything takes longer now that we have kids! We already had all of the tools that we needed for this project, but we had to invest in supplies.  The first weekend, we bought all of our supplies from Lowes and placed an order for garden soil and pea gravel from a local company.  Later on, we would buy our plants from a local nursery.

SUPPLY LIST
10 boards (8ft. long, 8in. wide, 2in. thick)
2 boards (8ft long, 4in. wide, 2in. thick)
a pack of galvanized screws (3in.)
3 packs of one inch chicken wire (2ft x 25ft)
a 24 pack of garden stakes (3ft)
a pack of plastic cable ties
3 plastic tomato pots (18-24 in. deep)
3 tomato cages
a sheet of plastic

TOOLS NEEDED
Miter saw
drill
wheel barrel
shovel
garden hoe
mallet
wire cutters

Step Two: Build Garden Boxes

The second weekend, my husband built four garden boxes by doing the following steps:
  1. Cut two of the 8ft boards into 2ft pieces, so you end up with eight 8ft pieces and eight 2ft pieces.
  2. Cut the 2x4s into 10in. pieces until you have sixteen total pieces.  The garden boxes are eight inches high, but you cut an addition two inches to place in the soil
  3. Assemble the boxes and screw your the together. 
Matt did the construction part of the garden completely on his own, so i'm sorry if my instructions were a little vague.
The third weekend, we put the garden together in the back yard and filled the boxes with soil.  We knew a good garden soil was important.   We purchased our soil from the same local place we purchase our mulch from.  When they delivered our mulch for our flower beds, we had them deliver the garden soil in the same order, since delivery is $40.  We don't have a truck, or else we would have just hauled it ourselves and not payed for delivery expenses.  To make sure we were buying the right amount of soil, we gave our box measurements to the company, and the company told us how much to buy based on those measurements.
Step Three: Create a Garden Layout

Once our boxes were built, we needed to figure out our layout.

I had an idea of what I wanted the garden layout to look like.  I told my husband what my vision was, and he meticulously measured everything, making sure that the spacing of the boxes was exact and that everything lined up beautifully!

Step Four: Cut out Grass

Next came the hard part.  Cutting out the grass!  Technically, I don't think you have to do this with raised beds.  From what I've read, you can put cardboard under your beds to kill the grass???  I wanted to make sure that everything took root (especially since our boxes were only 8 inches deep) and that we didn't have grass coming up through the beds.  We (and by we, I mean my husband) put in the extra sweat and labor and cut out the grass.  According to him, this was the hardest part of the entire process, so if you can muscle this, you can easily do a backyard garden.
Step Five: Put Down Chicken Wire

We had an annoying mole that kept showing up in our backyard last year.  To make sure he didn't destroy our garden, we invested in chicken wire with one inch holes.  Apparently chicken wire will keep moles out of your garden!

Since our boxes were two feet wide, the 2ftx25ft chicken wire was perfect!  We cut the wire the length of the boxes, placed the wire on top of the dirt, and then placed the boxes on top of the wire.

Once all four boxes were lined up.....

.....Matt used a mallet to press the boxes into the ground.
Step Six: Fill Boxes with Soil

Lastly, he loaded the garden soil up in the wheel barrel and filled the boxes with the soil.


Step Seven: Put Chicken Wire Around Garden
The fourth weekend, we planted our garden, put up a chicken wire fence and placed pea gravel in the garden!

We have rabbits in our backyard.  To keep them from eating our plants, we lined the garden with chicken wire.  It's only 2ft. high, so it is short enough for us to hop over.  To keep the chicken wire in place, we purchased 3ft. garden stakes and secured the wire to the stakes with cable ties.

Step Eight: Plant Garden
As first time gardeners, we chose to buy plants instead of seeds, with the exception of green beans.  All of our plants were from a local nursery.  I was surprised at how inexpensive the plants were.  4 packs of plants were only $1.99. I didn't think that price was bad, compared to the big box stores.  And since we are planting a small garden this year, as I do not want to be overwhelmed, the plants made things really easy for us.  We also planted marigolds in each box, as that is supposed to help keep insects away from the plants. For our small garden, we planted the following:

Box One - 3 zucchini plants
Box Two - 1 group of 3 pickling cucumber plants and 1 group of 3 burpless cucumber plants
Box Three - 2 Yellow squash plants, several onion bulbs
Box Four - 4 red bell pepper plants, 4 green bell pepper plants, 2 rows of green bean seeds
We also did three tomato plants in pots.
Step Nine: Put in Pea Gravel

Lastly, we cut plastic and placed it over the grass inside of our garden, before pouring pea gravel over it.  The purpose of the pea gravel was for easy maintenance, but I also think  it makes the finished garden look really nice.
Step Ten: Label the Plants

I also made some labels for the vegetable plants.  I'll try to get a post up about those tomorrow!

We've only had the garden for a couple of weeks, but we've already noticed growth in all of the plants!  Here's to hoping our garden produces yummy vegis for our family in a few months!


No comments:

Post a Comment