In all thy ways acknowledge him, and he shall direct thy paths. ~ Proverbs 3:6

Wednesday, April 27, 2011

Creating A Coffee Filter Lamp.....From A Goodwill Good Deal ~ $6 Lamp


I really wish that I could take the credit for coming up with this idea, but my creativity never led me to the idea of using coffee filters for a lamp shade!  I actually came across the idea somewhere in the blogosphere a few weeks ago.  When I saw the idea, I LOVED it!  I knew I had to try to create it.  Yesterday, I Googled "coffee filter lamp shade", and I came across a few tutorials. 

Once I looked over a tutorial, I went to Goodwill in search of an inexpensive lamp.  This lamp and lamp shade is my latest Goodwill good deal. The lamp was $3.99, and the shade was $1.99. 

If you plan on creating a coffee filter lamp shade, you're going to need a bag of coffee filters and a hot glue gun.  Begin by taking a filter and folding it in half.
Fold the half into thirds.

Fold it in half again.

Make one last fold bringing the middle point to the top of the filter.
You will end up with a coffee filter "flower".
Hot glue your "flowers" to your lamp shade until it looks the way you want it to.

After folding and gluing 200 coffee filters, the finished product will look something like this.

I really loved the pink lamp from Goodwill, and I really loved it with the new lamp shade.  Once I finished the project, I thought the lamp would go great in a shabby chic room or a girl's nursery.....but unfortunately the pretty pink lamp didn't match my decor. 
I needed a silver lamp for the table in my entry, so the pretty pink lamp was covered in silver spray paint.

Once the paint was dry, I plugged in my latest creation and watched it glow!  This project was really easy.  It did, however, take me awhile to complete, since I had to fold and glue 200 coffee filters.  It was worth the time though, because I love the look of this lamp!


This is the finished project!  Would you believe this lamp only cost me $6, since I already had hot glue and coffee filters?  Now that's a fantastic Goodwill good deal!

Tuesday, April 26, 2011

It's A Goodwill Good Deal ~ $1.50 Center Piece


While at Goodwill, I came across this serving dish for $1.50.  It was marked for $2.99, but it was half off.  I originally went to Goodwill looking for a large bowl to put fruit in and a goblet to use as the base of the bowl creating a serving dish that in my mind would look something like this picture.  I planned on gluing the bowl and goblet together and painting the entire piece.  When I came across this serving dish I discovered that it was more cost effective to purchase this one than it was to make my own.  It was also one less project I needed to complete to make my house a home.  Now that's a double deal that I can be happy about!

I think the new center piece goes great with my Ikea dishes.  I bought a set of tan and a set of grey dishes while I was at Ikea for only $19.99 a set (thirty pieces in each set).  I mixed and matched the sets to get the look I wanted, and I found the place mats at Ikea for $2.50 a piece.  They add texture to my table setting, and I really like the look it creates.
And of course the dishes were inspired from a display table that I fell in love with at Ikea.  It looked something like this ~ only the Ikea table was $299.99 and $29.99 for each chair.  I found this huge dining room table with eight chairs on Craigslist for only $75!  I haven't refinished the chairs yet, but I worked on the table this weekend and finished it late last night.  I am really happy with the result!  I can't wait to finish the chairs and show you the before and after when I'm finished!  There will be a post about it coming soon.

Remember my last Goodwill Good Deal.....$2 Candelabras.....


....check them out now.  Not too bad for only $2, huh?  There's nothing that  little bit of spray paint can't fix.  So if your keeping track.....that's $2 for the candelabras, $1.50 for the center piece and the table runner is just one yard of burlap that cost about $2.50 at JoAnne Fabrics after purchasing it with a coupon.


We've also been doing a lot of internet bargain shopping for large pieces of furniture lately.  The entry and dining room are almost complete.  Here's a sneek peak.  We are planning on painting the dining room this weekend, and if everything goes according to plan, I should be able to post a before and after of our first completed room in the new home sometime next week!  I can't wait!


This is my view from the love seat as I'm writing this post.  It's finally starting to come together!  Paint and wall decor will make it even better!

And yes, that is Chloe on the window seal waiting for the appropriate time to jump down without Molly chasing her.  And yes, that is Molly patiently waiting for Chloe to jump down, so she can chase Chloe and put her in her mouth.  That's a pretty typical evening in my house:)


Friday, April 22, 2011

Good Words For Good Friday


I don't have much to say today, but I think this song and portion of Scripture says it best.  


LAMB OF GLORY
Greg Nelson and Phil McHugh

Verse 1:
Hear the story from God's WordThat kings and priests and prophets heard
There would be a sacrifice
And blood would flow to pay sin's price

Verse 11:
On the cross God loved the world
While all the powers of hell were hurled
No one there could understand
The one they say was Christ the Lamb

Chorus:
Precious Lamb of Glory
Love's most wondrous story
Heart of God's redemption of man
Worship the Lamb of Glory


Luke 23:33-46 (King James Version)

 33And when they were come to the place, which is called Calvary, there they crucified him, and the malefactors, one on the right hand, and the other on the left.
 34Then said Jesus, Father, forgive them; for they know not what they do. And they parted his raiment, and cast lots.
 35And the people stood beholding. And the rulers also with them derided him, saying, He saved others; let him save himself, if he be Christ, the chosen of God.
 36And the soldiers also mocked him, coming to him, and offering him vinegar,
 37And saying, If thou be the king of the Jews, save thyself.
 38And a superscription also was written over him in letters of Greek, and Latin, and Hebrew, THIS IS THE KING OF THE JEWS.
 39And one of the malefactors which were hanged railed on him, saying, If thou be Christ, save thyself and us.
 40But the other answering rebuked him, saying, Dost not thou fear God, seeing thou art in the same condemnation?
 41And we indeed justly; for we receive the due reward of our deeds: but this man hath done nothing amiss.
 42And he said unto Jesus, Lord, remember me when thou comest into thy kingdom.
 43And Jesus said unto him, Verily I say unto thee, Today shalt thou be with me in paradise.
 44And it was about the sixth hour, and there was a darkness over all the earth until the ninth hour.
 45And the sun was darkened, and the veil of the temple was rent in the midst.
 46And when Jesus had cried with a loud voice, he said, Father, into thy hands I commend my spirit: and having said thus, he gave up the ghost.


Friday, April 8, 2011

Adding Flair To A Boring Lamp Shade


I love the lamps at Hobby Lobby, but I really love this lamp at Hobby Lobby.


          What I don’t love is the price; there’s no way I’m paying $89.99 for this lamp.  Even with a coupon, I just can’t justify spending that much on a lamp.  Since I knew I wasn’t going to purchase the lamp, I used it as my inspiration for adding a little flair to some existing lamps I had in our bedroom.   I purchased inexpensive flower pins/hair clips to dress up two lamps in our master bedroom.   My finished product doesn’t look nearly as whimsical as the Hobby Lobby lamp, but it was a fraction of the price.  
 There's no need for a tutorial for this project.  All I did was take my trusty hot glue gun, and I glued the flowers to the shade.  Super simple, but it gave me the look I was going for.  The atmosphere that I am trying to create in our master bedroom is vintage/whimsical/romantic, and I think the flowers on the shade help create that feeling.  It didn’t cost very much to dress up my already inexpensive $9.99 Wal-Mart lamps, and I’m pretty happy with the outcome. 
           If the flowers are a bit too much flair for you, there are all sorts of ways to dress up a lamp shade.  Trims, tassels, ribbons, and fabrics are just a few easy ways to change the look of lamp.  Have you added any flair to a boring shade lately?  If you have, please show me some pics of your creativeness and share your flair! :)

BEFORE

AFTER


Tuesday, April 5, 2011

It's a Goodwill Good Deal ~ $2 Candelabras


While recently rummaging through a Goodwill store, I came across these two iron candelabras.  I only paid $1 a piece for them, so it was really good buy.  They need a little bit of TLC, but I can make them beautiful with little time and effort!  I thought they would go nice on my dining room table.  I like the blue color; it’s kind of rustic and shabby chic, but I think they are going to end up being silver when I’m finished with them.  The blue doesn’t really go with my décor.  Anyway, considering I only used the change out of my change purse when purchasing these, I’m pretty excited about this Goodwill good deal.  What kind of Goodwill purchases have you made recently?  Please share how you’ve turned someone else’s useless item into something useful for your home:)


Sunday, April 3, 2011

Sheets Turned Into No Sew Window Panels


         Ok, so when we bought our house, one of the first things we had to do was get blinds for all of the windows.  We purposefully didn't get any kind of window treatment for the sliding glass doors in our kitchen at that time, because I didn't want the sliding blinds that we had in our last house (I don't really care for them even though I understand their practicality).  That meant that if we were in our kitchen at night and the lights were on, all of our neighbors could see directly into our kitchen, so I had to come up with a solution.  I knew I wanted window panels, but they couldn't be regular panels.  We use the sliding glass door to take the dog out all the time, so the panels needed to be beautiful but practical.
        Then, I had an idea.  I had two sets of identical queen size sheets that I used when I lived in my apartment.  They were the right color for my kitchen, and I thought that I might be able to sew them into window panels.  After pulling them out, I realized that I didn't need to sew them at all, because they already had perfectly good hem lines.  I could fold them in half and use a no sew adhesive to create a window panel.  That solved half of my problem.
        The other half of the problem was the practicality part, but then I found drapery clip rings at Target.  Problem solved!  The clips slide across a curtain rod with ease, making it extremely practical for our sliding glass door!  
       Now no one can see in our house at night when the lights are on, and I don’t have to look at ugly sliding blinds!  Here’s how I did it……

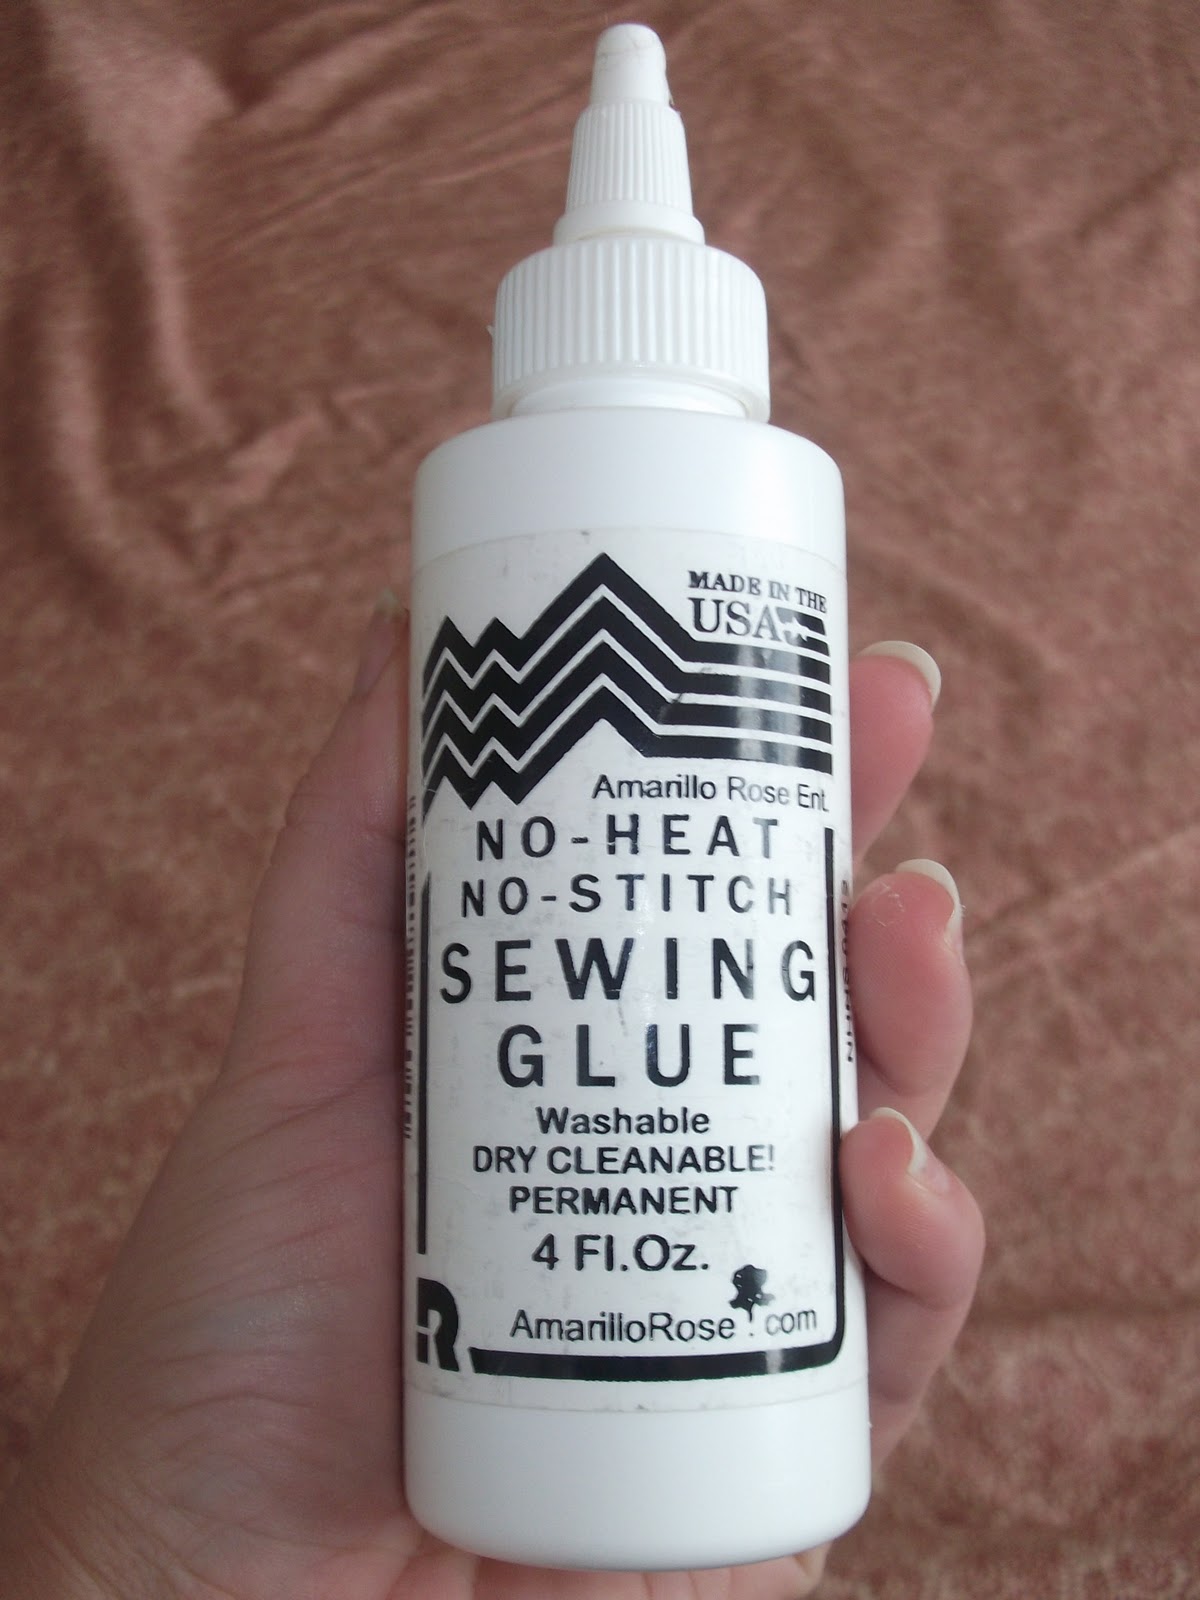
I bought this product at my local craft store for $2.69.  The heat adhesive strips that can be ironed onto fabric would work just as well as this product.  The strips are a little more expensive than the glue, and since the sheets already had a perfectly good hem, I chose to purchase the glue. 

I got these at Target.  I spent $4-$6 for each package...I think.  I'm not sure of the exact price, because I bought them a few weeks ago with this project in mind.  There are seven clips in each pack, and they can be found in just about any department store.

These are two sets of queen size sheets I used in my apartment before I got married....and they haven't been used since I've been married.  That meant I either needed to get rid of them or find a different use for them.  I chose to find a different use, and I'm pretty happy with the outcome.  For this project, I used the queen size flat sheet from each set.  

The first thing you need to do is iron your sheet.  This was the longest part of this entire project.  My sheets had been stored for awhile, and they had lots of stubborn wrinkles.

Once you get the wrinkles out, fold your sheet in half.  It is important that you take the time to make sure you have folded the sheet in half perfectly.  Once you fold it in half, begin ironing the fold, so that the fold is nice and crisp. 
The rest of the project is super easy.  Just take your glue and begin gluing along the fold line to create a glued hem line.  Then glue the existing hem lines together on the remaining three sides of your sheet.  This will make one panel curtain.  You shouldn't need to use a curtain liner for this project.  The folded fabric should be thick enough to keep the light out. 
Just make sure to only glue a little bit at a time.  Once you've glued, pinch the hem lines together for a few seconds; just so you know it's going to hold.....and that's it!  Once you've glued the sides of the folded sheet, you've successfully made one panel!  Now take your other sheet, and do it all over again to make your second panel:)

Once both panels are complete, clip on your drapery clip rings to the top of your curtains.

Then, hang up your curtains, take a step back and look at what you've created without doing any sewing! I have four matching pillow cases, and I'm thinking about making a no sew valance to go above my kitchen sink....but we'll see....not sure if I will or not.

This isn't the best picture, because of the way the sun was coming in the kitchen.....but it's the best I could do.  Here's my finished product.  I'm pretty happy with it, and by using some things that I already had, this whole project cost me around $10!  Now that's definitely something to be happy about ;)