In all thy ways acknowledge him, and he shall direct thy paths. ~ Proverbs 3:6

Wednesday, July 20, 2016

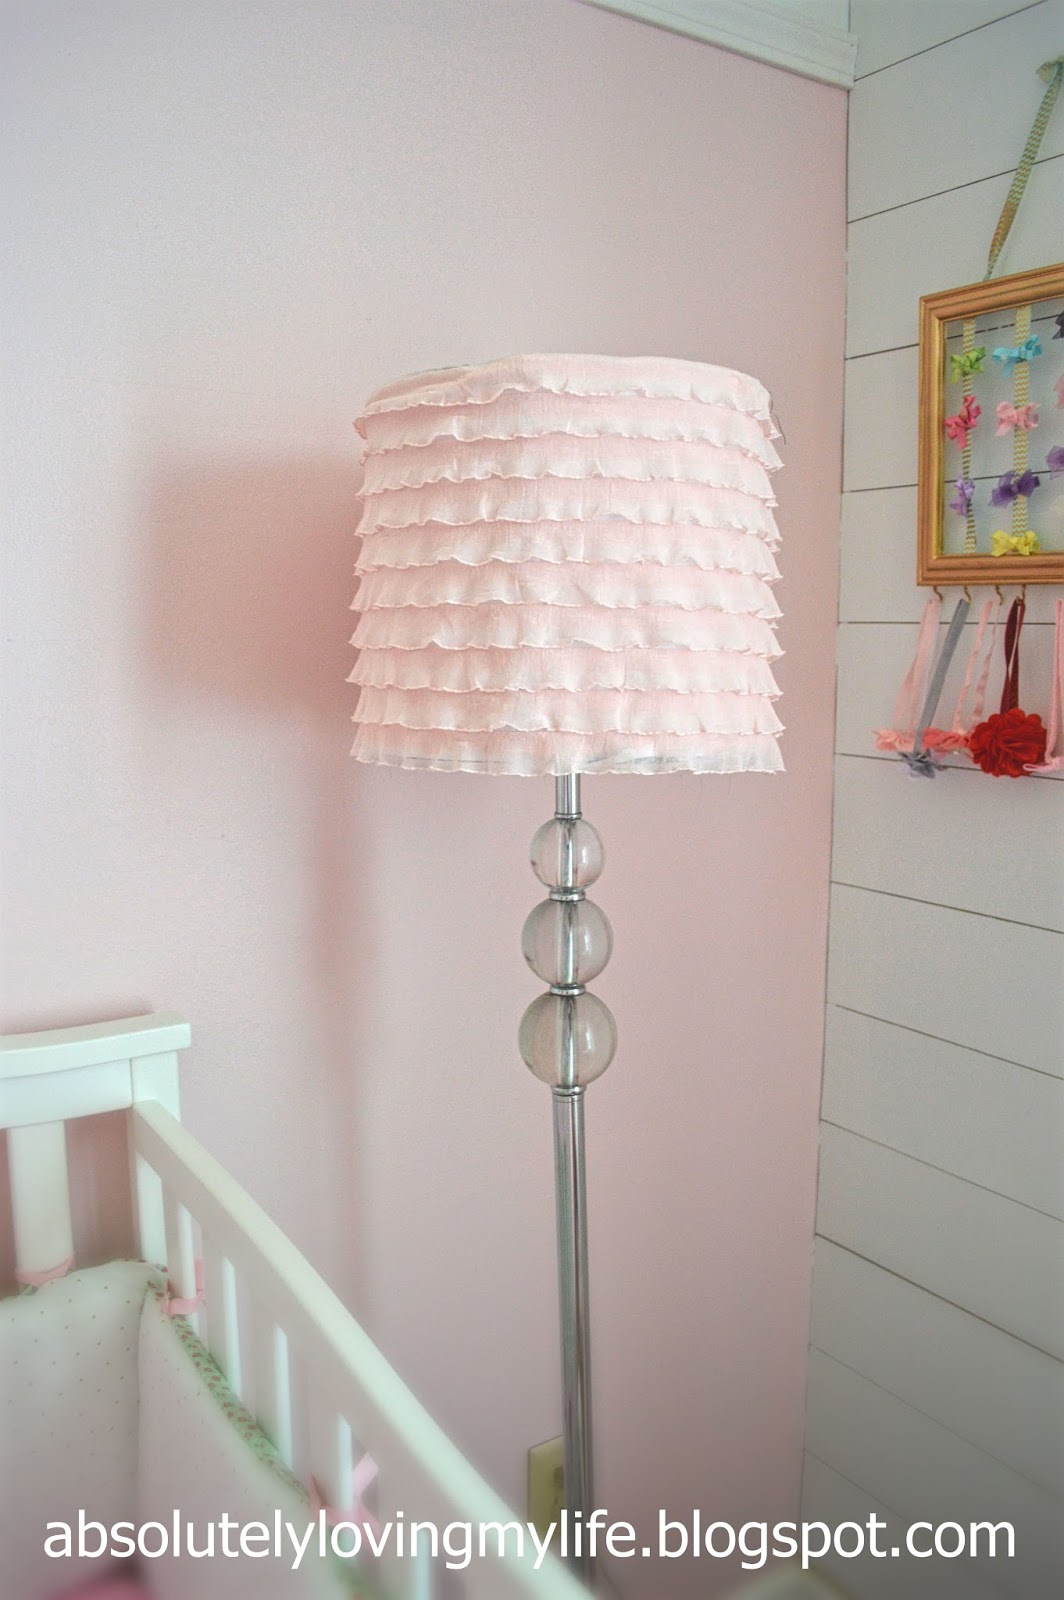
Upcycled Ruffle Lampshade

 
Good Morning!  I'm starting my day by sharing an easy lampshade makeover! 
 
Lampshades can be pricy, easily costing $10-30 for one lampshade.  For me personally, I have a hard time justifying the high-end of those prices when:
 
1) I can find lampshades at Goodwill or garage sales for $5 or less.
 
2) I think lampshades are one of the easiest things to give a new look to by simply recovering with fabric or paper.
 
And so that's exactly what I did for the floor lamp in Charlotte's room.
Using leftover fabric from the curtains I made for her room, I covered a drum-shade that was being unused in my collection of "things I might want reuse someday pile" in the basement.

Yep, I'm one of "those" people.

Certainly not a hoarder by any means, but I keep things stored in a place downstairs if I think I can repurpose it in the future.

The lampshade actually came with a lamp that I purchased from a garage sale.  I ended up using the lamp and not the shade.
The fabric could not have been more perfect for this project!  I found it at Hobby Lobby in the seasonal collection for spring.  It comes just like you see it, hanging beautifully with pink ruffles.

All I had to do was cut the fabric to fit the lamp, and then hot glue the fabric to the top of the shade.

My only complaint is that because the fabric is semi-sheer and my shade had a pattern on it, when the lamp is turned on I can see the silhouette of the pattern.  A solid color shade, preferable white, would have been better for this project.  If I come across one for a few bucks, I'll replace the drum under the fabric.
As for that beautiful lamp base, I found that at Goodwill for $5 a couple years ago.  I was using it in this room when it was a guestroom.  All I did was give it a new look before using it in the nursery.
 
With a little repurposing and recycling from things I already had in my home, the floor lamp in the nursery is both functional and beautiful, and it didn't end up costing me anything.


Tuesday, July 19, 2016

Easy Paper Banner for Girl's Nursery

This afternoon I want to very quickly share an easy project I did for Charlotte's nursery that only cost me a couple of bucks.

Yes it's another banner.

I know I shared a fabric banner this morning.  Adorable banners are all the rage lately, and both of the banners I'm sharing today are visually different from one another in several ways.
Unlike the banner I shared this morning, this one is more of a traditional banner with triangles made from scrapbook paper. 

To make this I simply used a triangle template, traced the triangle on the back of scrapbook paper, cut out the triangles, folded the top edges of the triangles over a piece of twine, taped the folded edges to the twine, and spaced the paper triangles evenly on the twine.

Triangle or banner templates can be found for free on the internet.  Anyone can do a Google search and print a template that can be cut out from computer paper or cardstock.  For this particular banner, I just used  one of the banner pieces I had from the boys' birthday party.
Once complete, I nailed the banner underneath a chalkboard that I purchased from the clearance section of my local Home Goods, and later wrote the phrase, "Dream Big Baby Girl!" on it before hanging it on the wall.
This is such an easy project that I sometimes feel it shouldn't even be called a project.  But it's the little details like this that, in my opinion, help complete the look of a space. 

This little corner of the wall wouldn't quite be the same if I only hung the chalkboard on the wall but didn't hang the banner underneath it.

Because, for me, details are important. 

It's those finishing touches that help enhance what was already there.

Whimsical Fabric Banner for Girl Nursery

Good Morning!  It's day two of posting about DIY projects that were completed for our little girl's nursery.  I'll start the morning off by sharing an easy fabric banner that looks both rustic and whimsical.
What I love about this is that I just used scrap fabric from all of the other textile projects from this room!  Extra fabric from the curtains and bedding, along with pieces of ribbon from other projects, were recycled to make this piece.
To make the banner, I simply tore fabric into approximately one inch thick pieces. 

I then cut several pieces of fabric and ribbon into approximately twelve inch length strips. 

From there, I just tied the pieces onto a long piece of twine, arranging the pieces in somewhat of a pattern.

I did not measure anything.  What makes this look whimsical is that it is perfectly imperfect.  I just eyeballed the width and length of the pieces.  Perfection is not the goal here.  Getting the banner completed in 15 minutes or less was my goal!

Lastly, I nailed the banner above the crib and under a wooden monogram that I spray painted gold.
I really like the simplicity of this banner and how it looks in combination with the monogram over the crib.  It makes a great focal point on the wall and helps tie the room together by using all of the different colors and fabrics from the room.

Monday, July 18, 2016

Headband Holder from an Oatmeal Container

 
In my last blog post, I mentioned how I planned on sharing several DIY projects over the next few days that were completed for Baby Girl's nursery. This morning I posted about the DIY bow and headband holder made from a Goodwill picture frame.   This evening I'm blogging about the DIY headband holder made from a Goodwill candle holder and an oatmeal container.
Yep, that's right. 

Another bow holder.

Because what I quickly learned about resale shopping for a girl, is that baby girls can never have enough accessories!
What I love about this project is that it was cheap, easy and the outside displays headbands, while the inside can hold more bows and accessories.
To make this project, I took piece of scrapbook paper and cut it to the size of an empty oatmeal container, before gluing the paper to the container.  Using gold spray paint, I painted the oatmeal lid and a Goodwill candle stick base.  Once dry, I hot glued the candlestick holder to the bottom of the oatmeal container.

And that's all she wrote, folks!  Another easy Pinterest project complete for a baby girl nursery!

Baby Girl Bow and Headband Frame


When I found out we were pregnant with a baby girl this past February, a lot of things went though my mind.  I found myself excited about having a girl for several reasons.  One reason being that I was going to get to create a space for a little girl to grow up in, by turning our guestroom into a girl's room.  To do this, there was much planning and DIYing that had to be done before Baby Girl's arrival.
I plan on spending the next several days posting about all of the DIY projects that were completed for Baby Girl's nursery.  
I'll start this morning by sharing a simple bow and headband display made with a cheap Goodwill picture frame, spray paint, ribbon, hot glue and hooks. 
For this project, I simply bought a frame at Goodwill, took the picture and the glass out of the frame and spray painted the frame gold.  Once dry, I cut four strips of ribbon the length of my frame, and hot glued the strips of ribbon to the back of the frame.
I then tied a piece of ribbon to each bracket on the back of the frame, and then I tied those two pieces of ribbon together, creating something that could hang on the wall from the ribbon.

Lastly, I bought a pack of small gold hooks from the hardware store and screwed them into the bottom of the wooden frame.  This would be a good time to say that this worked only because my frame was wooden.  A plastic frame would not have worked for this.
I'm very pleased with how this turned out.  Thank you Pinterest for the idea, as this was super-easy and displays bows and head bands.


Friday, July 15, 2016

Baby Girl Maternity Photos

 
I'm not sure how I'm sitting here with a six week old sleeping next to me, and I still don't have a blog post of our maternity pictures up? Pictures that were taken three months ago!
 
I know it's late, but I did want to put a few of our maternity pictures on the blog, as I was very pleased with how some of these turned out! 
 
It's never fun feeling like a whale and having a camera on you, but I'm always glad that we arrange to have pictures taken during these special times of life.  No regrets about it, no matter how unattractive I might feel.  We feel very blessed to have been able to experience the gift of pregnancy for a second time, and these pictures capture a time in our life I will always treasure.
 
As always Dave at Kingfish photography took our pictures for us.  I was 35 weeks pregnant at the time, and we were fortunate to still have some trees with blooms on them at the park where we took the photos.  He did a great job!  If you are local to Indy, be sure to look them up on Facebook.


All pictures were taken by Kingfish photography and may not be used or copied without permission.

Six weeks and adjusting.....

 
Our sweet Charlotte blessed us with her presence six weeks ago, making my postpartum recovery time officially over.  Adjusting to my new life with three kids, two years old and under is in full-swing.
 
The first three weeks after Charlotte was born, I felt very grateful to have Matthew home with me.  His work mandated three weeks paid paternity leave beginning in 2016.  This was a big difference from the one day of paid paternity he got when the twins were born two years ago.
 
Physically, my recovery was much easier after this delivery, only because I didn't have a C-section.  The first week, I was up and at 'em, and in hind-sight, doing way more than I should have been doing.  Only home a few hours, yet I found myself cleaning the house and taking family walks.  Not wanting to waste any of the precious time we had Daddy home with us, I made sure to arrange fun summer things to do with the boys, like going to the strawberry patch, the zoo, the splash pad and a few playgrounds.  We made fun memories, but I do wish that I would have taken more time to rest during those three weeks, as I was feeling really tired and fatigued by the time Matt went back to work.
 
One great thing about having Matt home for three weeks was that he was a HUGE help with our rambunctious two year olds.  Having his help with them was greatly appreciated, as both boys were displaying behavior issues in the days and weeks that followed their sister's arrival.  He would often take them with him to the gym or the pool to burn off energy, and I would often take one of them with me for quick errands here and there, just to try to get a little one-on-one time with them, as we all adjusted to a new baby in the house.  Daddy even camped out with them in the living room one night, which the boys of course loved, and I took them on a donut date one morning to show them a little extra attention.  Six weeks into our new lives with a baby, and the big brothers are still adjusting but doing much better than when baby sister first came home.
 
When the three weeks of paternity leave were over, we were all ready to get back into a routine.  Matt was more than ready to go back to work.  I was obviously not looking forward to doing twelve hour days on my own, but I was anxious to get back to a daily schedule.  
 
Three weeks later and into a new routine with three little ones in the house, and I'm not gonna lie....I am one tired mama!  I'm still adjusting and trying to find my groove.  I wish I could be Super Mom and get a bazillion things done in a day, while taking care of my "angel" kids....BUT....
 
The reality is that my days start early and end late.
 
And most days I'm just keeping my kids alive.
 
I've come to ACCEPT that.....
 
They don't call it the terrible two for nothing.  My twins are more work now than when they were babies, and more exhausting than the new baby!
 
Showering can only happen at night after Matt gets home.
 
Messy buns and maxi skirts define my outward appearance this summer.
 
Wearing a little makeup, perfume and jewelry help me feel better about myself in the mornings.
 
Coffee gets reheated at least 2-3 times each morning before finishing a cup.
 
A sugar-free protein bar is what I'm calling breakfast.
 
Baby weight takes time and work to come off.
 
Only getting my cloth diapers and one other load of laundry accomplished in a day is sufficient for now.
 
Making easy meals every night will do just fine until I can figure out a way to make more time in the kitchen.  After all, no one is starving around here.
 
Getting the house cleaned on the weekends is not ideal, but for now it is the only time I can do it, and that's ok.
 
Nursing is a full time job.  Somehow, I had forgotten that.
 
Daddy taking the boys out of the house for a couple hours on the weekend and leaving me with the newborn feels like vacation.
 
Getting a nap is not realistic, but if all three kids nap at the exact same time, I TAKE ADVANTAGE OF IT AND NAP TOO!
 
Freezing and canning what I have time for from the garden is all that's going to happen this year, and giving away the rest can be a blessing to someone else.
 
Shopping with two toddlers and an infant has been interesting, but we are managing.  I am certain that every week I go through the checkout line with a screaming infant who knows it has been two hours and is ready to nurse,  and a two toddlers that have been confined to a cart for too long with an insane amount of energy laughing and speaking in their own twin language for all of Target to hear.....well, I am certain watching us checkout is great birth control for all of the teenage cashiers.
 
Blogging or doing anything for myself will happen when it happens, as it is not something that NEEDS to get done.
 
And most importantly, taking a moment to cuddle my newborn or play with my boys should always trump my to-do-list.
 
Why? Because time will always move forward, and I will never get these moments back again.